Driveway Pressure Washing Techniques | Step-by-Step Pro Guide
A Clean Driveway Isn’t Just About Looks—It’s About Longevity, Safety, and Curb Appeal
We’ve all seen it—that one house on the block with the freshly cleaned driveway. It’s like the whole property shines brighter. But the real story isn’t just the visual payoff. Clean concrete lasts longer. It stays safer, especially during wet seasons. And for professionals in the game, it shows the kind of care that earns trust and repeat business.
If you’re a pressure washing contractor, a skilled home service pro, or even a DIYer with high standards, you already know this work isn’t as simple as pointing and spraying. You need the right method. You need the right gear. And above all, you need to deliver results without cutting corners.
This guide breaks down the entire driveway pressure washing process—from pre-treatment to technique to aftercare. Whether you’re training a new tech or refining your personal workflow, we’re going beyond basics to help you clean smarter, faster, and more effectively.
You’ll learn what tools actually matter, how to avoid common damage pitfalls, and how to give your clients (or yourself) results that turn heads.
Before we dive into technique, let’s talk tools—the foundation of any successful wash.
Tools of the Trade: What You’ll Need
Let’s get one thing straight: the quality of your results is directly tied to the quality of your tools. Not in a “buy the most expensive rig” way—but in a “don’t bring a garden hose to a fire” kind of way. Your gear should be built for driveways. Period.
✅ Pressure Washer: Go Big or Don’t Go At All
If you’re working with anything under 3,000 PSI, you’re not pressure washing a driveway—you’re watering it.
For concrete, you need:
PSI (Pounds per Square Inch): Aim for 3,000–3,500 PSI. It provides enough force to remove grime without damaging the surface.
GPM (Gallons per Minute): 4.0 GPM is ideal. More flow = faster results.
Too much pressure can etch concrete. Too little wastes your time. Balance is key.
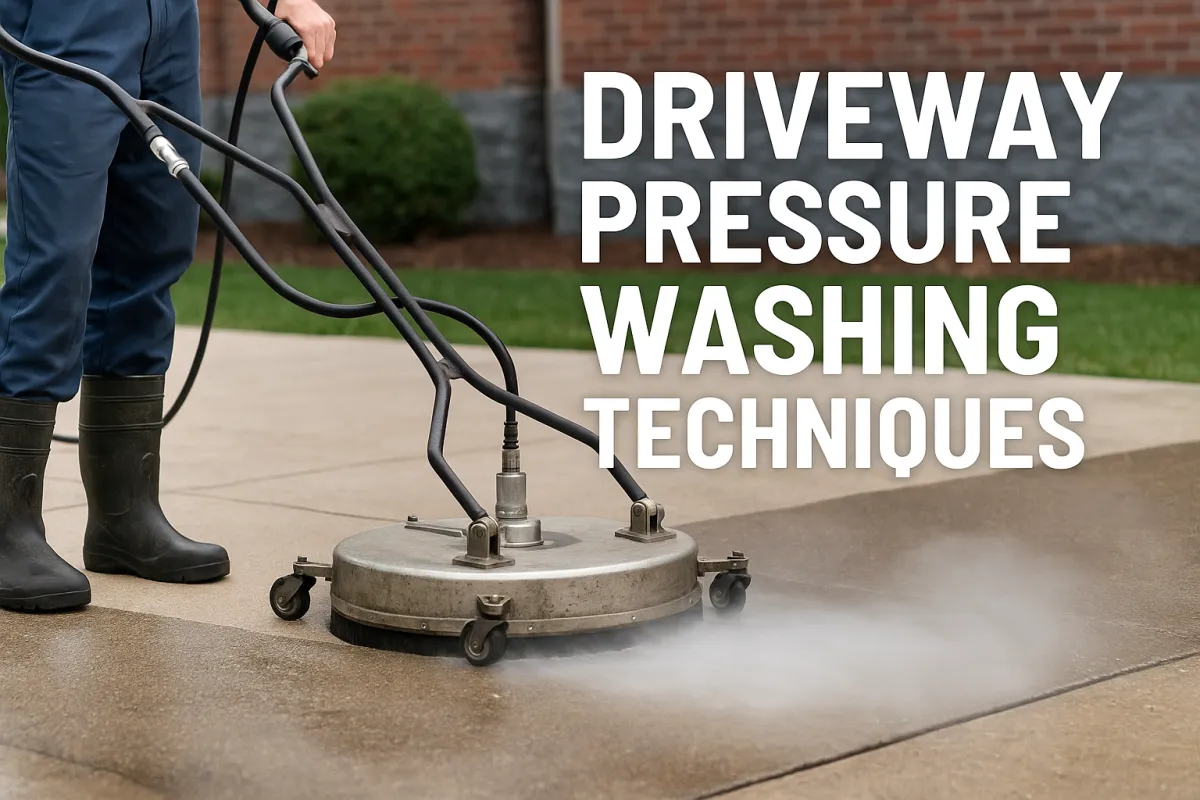
✅ Surface Cleaner Attachment: Your Secret Weapon
Think of this like the power tool version of a Zamboni. It glides over the surface, spinning dual nozzles under a hood to create uniform cleaning.
No streaks.
No wasted time.
Up to 4x faster than using a wand alone.
If you’re still wand-washing an entire driveway, you're not working efficiently—and your results show it.
✅ Nozzles: One Size Does Not Fit All
You’ll want a nozzle set that includes:
15-degree tip: For precise, angled cleaning. Best for edges and lifting stains.
Turbo tip: For spot cleaning only—never the whole driveway.
Soap tip: Used to apply pre-treatments. Low pressure, wide spray.
Switching between nozzles isn't just technical fluff. It’s how you protect surfaces and your reputation.
✅ Pre-Treatment Sprayer: Lift Before You Blast
Oils, rust, mildew—these aren't just surface stains. They soak into the pores of concrete. If you try to blast them out without a pre-treatment, you’ll waste time and still leave residue behind.
Use a dedicated sprayer to apply:
A biodegradable degreaser (for oil or tire marks)
A mildew remover (for shaded areas or older concrete)
Let it dwell for 10–15 minutes before you wash. This one step can cut your total wash time in half.
✅ Safety Gear: Non-Negotiable
Concrete doesn’t play around. You’re dealing with chemicals, high-pressure jets, and heavy equipment. So gear up like a pro.
Waterproof boots with good grip
Chemical-resistant gloves
Protective eyewear
Optional but smart: noise-cancelling earmuffs and a long-sleeve splash guard
No job is worth risking injury. And showing up geared up tells the client: This is what professionalism looks like.
Pro Tip: The best all-around combo for driveway jobs? A 3,000+ PSI washer paired with a 15" surface cleaner. It hits the sweet spot of power and coverage for most residential concrete.
Ready to see these tools in action? Let’s jump into the prep phase—the difference between a job done fast and a job done right.
How to Prepare a Driveway for Pressure Washing
Power without preparation is a recipe for poor results. Before you fire up your washer, you need to lay the groundwork. That means removing obstacles, minimizing risks, and setting yourself up for a clean that lasts.
And let’s be honest—this is the part most people skip. But pros know better.
Here’s your pre-wash checklist:
✅ Clear the Area
Sounds obvious, right? But too many jobs start with someone trying to spray around a garden hose, trash bin, or basketball hoop.
Move vehicles, toys, hoses, pots, and anything else that might get in the way.
Communicate with the client: “I’ll need the driveway completely clear before I start.”
It’s not just about convenience—it’s about safety and precision.
✅ Sweep or Blow Off Debris
Before water hits concrete, clear away the loose stuff. Dirt, leaves, acorns, gravel—if left in place, they’ll just swirl around and resettle in your rinse phase.
Use a leaf blower or stiff broom. Quick pass. Clean canvas.
✅ Pre-Treat Oil, Mold, or Algae
This is the pro move that most DIYers miss. Treating stains before pressure hits the surface saves time and improves outcomes dramatically.
Use a degreaser for oil stains and rubber tire marks.
For mildew or mold, apply a mildewcide or bleach-based solution.
Let it dwell 10–15 minutes before rinsing.
🧪 Bonus Insight: Pre-treatment increases cleaning effectiveness by up to 40%. That’s less pressure, less labor, better results.
✅ Wet Nearby Plants
This one’s critical—especially if you’re using chemical treatments.
Spray down any grass, shrubs, or mulch before and after applying your cleaner. The initial soak creates a water barrier; the final rinse washes off any residue.
Your client may not notice you doing this—but they will notice if their flower beds start dying the next day.
✅ Inspect the Surface
Before you begin, walk the driveway and check for:
Cracks or spalling
Flaking or chipped areas
Discolored patches
Low spots where water may pool
Make note of these and, if necessary, document them. It protects you from blame later—and it gives your client confidence that you care about the details.
Prepped and ready? Let’s break down the right pressure washing techniques that avoid damage and deliver pro-grade results.
Step-by-Step: Washing Like a Pro
Now we’re in the thick of it. But don’t let the sound of the engine fool you—technique still matters more than power.
Here's how to wash a driveway efficiently, safely, and with consistent, streak-free results.
✅ Start from the Top
Always begin at the highest point of the driveway. Let gravity work in your favor.
Washing downhill allows water to flow naturally—carrying debris, dirt, and suds away from areas you've already cleaned.
It also prevents backtracking, which wastes time and leaves watermarks.
✅ Use Consistent Overlapping Strokes
This is where experience shows.
Move the surface cleaner in even, overlapping lines, like mowing a lawn.
Overlap each pass by 25-50% to avoid streaks.
Keep your pace steady—not too fast, not too slow.
Consistency beats speed. Always.
✅ Surface Cleaner First, Wand Second
Here’s the sequence every pro should follow:
Surface cleaner for the large flat areas
Wand with 15-degree nozzle for the perimeter and tight edges
The surface cleaner does the bulk of the work fast and evenly. The wand handles the detail work your circular cleaner can’t reach.
This dual-pass method delivers that polished, finished look. It's what separates a “decent job” from a professional-grade result.
✅ Apply Even Pressure—No Hovering
The temptation to blast tough stains into oblivion is real. Resist it.
Staying in one spot too long—even with a surface cleaner—can cause etching. The result? A permanent mark on your client's driveway—and maybe on your reputation.
Let the pre-treatment do the heavy lifting, then wash it away with control.
✅ Rinse with a Wide-Angle Tip
After cleaning, switch to a 40-degree nozzle and rinse the entire surface.
Why? Because loose debris, chemical residue, and fine sediment will still be lingering—and they can dry back into the pores of the concrete if left behind.
Start at the top. Rinse down and out toward the street. Keep your nozzle at a consistent distance, about 12–18 inches from the surface.
Surface Cleaner vs. Wand: When to Use Each
Let’s clarify when and why each tool comes into play:
🌀 Surface Cleaner
Ideal for large, flat concrete areas
Covers more ground in less time
Delivers streak-free, uniform results
Prevents those “zebra stripe” marks that scream amateur
🔫 Wand
Perfect for edges, corners, and detail work
Reaches spots the surface cleaner can’t (near garage trim or tight walkways)
Use a 15-degree tip for precision, or a turbo nozzle for stubborn spots (briefly!)
The pro move? Use both. Don't cut corners. Literally.
Even a perfect clean won’t last without protection—let’s seal the deal.
What to Do After Washing a Driveway
You’ve put in the work. The driveway is spotless. But you’re not quite done yet.
This is where pros stand out—because what happens after the wash determines how long those results last, and how impressed your client stays in the months ahead.
✅ Let It Dry (All the Way)
Don’t rush this. A newly cleaned driveway needs 24 to 48 hours to fully dry—especially if you plan on sealing it.
Why it matters: Moisture trapped under a sealer can cause clouding, peeling, or even re-staining from underneath. The surface may look dry, but underneath, it might still be damp. When in doubt, wait.
Use this time to educate your client. Set expectations and explain why letting it sit is part of the process, not a delay.
✅ Apply a Concrete Sealer (Optional, but Highly Recommended)
Sealing is the finishing touch that turns a job into an investment.
It:
Locks out future stains
Protects against UV and weather damage
Makes future cleanings faster and easier
Use a penetrating sealer for natural concrete look, or a wet-look acrylic if your client prefers a darker, richer tone. Always check compatibility with the type of concrete and local climate.
✅ Schedule Regular Maintenance
Want to build long-term client relationships? Help them keep their surface clean year-round.
Suggest a bi-annual check-up:
Spring: Remove winter grime and salt
Fall: Clear organic buildup before it sets in
You’ll stay top of mind, keep their property in top shape, and create a reliable revenue stream.
When to Recommend Sealing to Clients
Sealing isn’t a one-size-fits-all suggestion. But in the right conditions, it’s a game-changer.
Recommend sealing for:
High-Traffic Driveways – Think multi-car households, delivery vehicles, or commercial properties.
Stained or Porous Concrete – If the surface has been previously neglected or is highly absorbent.
Harsh Weather Zones – Freezing temps, heavy rains, or extreme heat all take a toll on exposed concrete.
Help your clients understand that sealing is protection—not just polish.
Let’s recap with some common mistakes pros should avoid—and how to stand out with better results.
Rookie Errors That Hurt Results (and Concrete)
Even with the best tools and intentions, skipping fundamentals can lead to big issues. And in this industry, those issues come with callbacks, damage claims, or a bruised reputation.
Let’s keep that from happening.
🚫 Using Too Much PSI
This is a common one—and a costly one. Cranking up to 4,000+ PSI might sound efficient, but it puts your concrete at serious risk.
It can:
Etch the surface
Create lines or gouges
Accelerate wear
Stay within the 3,000–3,500 PSI range, and always adjust based on surface age and condition.
🚫 Skipping Pre-Treatment
If you’re relying solely on water pressure to clean oil stains, mold, or algae—you’re wasting effort.
Pre-treatment:
Softens contaminants
Cuts cleaning time
Reduces the need for harsh pressure
No pre-treatment = longer jobs and worse results.
🚫 Washing Against the Slope
Water flows downhill for a reason.
Starting at the base of the driveway means you’re fighting gravity, pushing dirty water back over clean spots, and doubling your work. Always start at the highest point and let the flow work with you.
🚫 Inconsistent Overlap
Ever see a driveway with light-and-dark stripes? That’s the mark of someone rushing—or worse, someone untrained.
Avoid “zebra striping” by overlapping each pass by 25–50%. Maintain a steady pace. Keep your tool level and your distance consistent.
🚫 Wrong Nozzle, Wrong Time
Not all nozzles are created equal. A zero-degree tip might be useful on rusted rebar—but it has no business on a concrete driveway. Ever.
Stick to:
15-degree tips for targeted cleaning
25 to 40-degree tips for rinsing
Surface cleaner attachments for uniform results
Mastering your nozzles is the fastest way to reduce risk and elevate quality.
Looking to go from good to elite? These pro tips will get your results noticed.
Advanced Tricks Every Pro Should Know
Want to separate yourself from the average guy with a power washer? Want your clients calling you back—and telling their neighbors why?
Here’s how.
✅ Work in Cooler Weather
Heat and sun speed up evaporation, which can cause streaking, shadowing, or detergent residue drying too fast.
Morning or late afternoon jobs offer:
Slower dry times (for better rinses)
Easier chemical dwell time
More comfort for you or your crew
Timing your jobs right gives you cleaner finishes and less rework.
✅ Use Eco-Friendly Cleaners
They’re not just safer—they’re smarter.
Meet HOA or local city code
Protect landscaping
Build trust with environmentally conscious clients
Position it as a value-add. “We use solutions that are tough on grime—but gentle on your property.”
✅ Document Your Work Visually
Before-and-after photos aren’t just for Instagram (though they help).
They’re:
Sales tools
Proof of performance
Portfolio material
Take clean, consistent shots of your work. Build a visual library for your website, proposals, and social content.
✅ Offer Add-On Services
Upselling doesn’t mean being pushy—it means being useful.
Depending on the project, consider bundling:
Concrete sealing
Rust removal
Algae or mildew prevention
Parking stripe touch-ups
Clients often don’t know what they need until you show them. Be the expert. Offer solutions.
Before we wrap, let’s answer the most common questions homeowners and new pros ask.
FAQs About Driveway Pressure Washing
You’ve got the gear. You know the method. But some questions still come up—whether from clients or even your own crew. Let’s clear up the most common ones so you’re always the expert in the room.
❓ What PSI Is Safe for Concrete Driveways?
For most standard concrete driveways, 3,000 to 3,500 PSI is the safe, effective range.
Go below that, and you’re not breaking through surface grime. Go above that—especially with an aggressive nozzle—and you risk spalling (where surface layers break apart), permanent etching, or damage to expansion joints.
If you're ever unsure, start low and test a small inconspicuous spot. The surface will tell you what it can handle.
❓ Can Pressure Washing Damage My Driveway?
Yes—and it happens more often than you’d think.
Here’s what causes damage:
Using a zero-degree nozzle (like using a scalpel when you need a paintbrush)
Holding the wand too close
Applying too much pressure in one spot
Not identifying pre-existing cracks or spalls
Professional technique and the right attachments (like a surface cleaner) dramatically reduce the risk. That's why training—and not just tools—separates the pros from the weekend warriors.
❓ Should I Seal My Driveway After Washing?
If your client wants results that last, sealing is a smart next step.
Sealing:
Protects against oil stains and UV damage
Reduces mold/mildew growth
Improves water runoff and minimizes erosion
While it's not mandatory after every wash, sealing is highly recommended after deep cleaning or stain removal. It’s the difference between maintenance and transformation.
Let your client know it’s an investment in the longevity of their concrete—not just an upsell.
❓ How Often Should I Pressure Wash a Driveway?
At minimum, once per year.
But in high-traffic zones, shaded areas prone to mildew, or locations near trees and runoff, twice a year is ideal—typically spring and fall.
Regular washing extends the life of the surface, boosts curb appeal, and reduces the need for harsher chemicals or heavy pressure in future cleanings.
Conclusion: Take the Pressure Off—Do It Right the First Time
Mastering driveway pressure washing techniques isn’t just about getting the concrete clean. It’s about running a smarter business. One that saves time, prevents mistakes, and delivers results you’re proud to put your name on.
Remember:
Gear matters—but so does prep.
Technique beats raw force.
Small details make a big difference.
Whether you’re training your team, dialing in your own workflow, or building out your service packages—this guide is your blueprint for excellence on every driveway job you touch.
